2011年3月9日 星期三

Alfresco內設定排程作業(Scheduled Actions)

真實世界的資料處理,例如:申請、收單、審核與決行,很少是一氣呵成的同步作業(Synchronous Transaction),通常需要不同的角色(Actor)於不特定時間的接力處理。其實非同步(Asynchronous Transaction)的設計模式正好可以把複雜的流程拆解成較小的段落,讓開發者得專注在個別的問題領域,降低程式錯誤機率,以及最寶貴的設計原則:提高系統變動彈性。

Alfresco本身非常適合非同步的資料處理,藉由存放區(Space)、規則引擎(Rule Engine)、排程作業(Scheduled Action)以及自動流程引擎(Workflow Engine)等機制,讓企業的日常工作變得井然有序。本篇就來介紹如何定義一個新的排程。延續前幾篇文章的費用申請場景;員工將費用申請憑證以及相關屬性存入『費用申請』檔案夾後,Alfresco每隔五分鐘來巡視是否有申請單進來,申請單如果符合必要條件;以本例來說:就是檔案內含ExpenseDetails這個屬性集,則將申請單移至『費用審核』檔案夾等待審核。

一個排程作業是由三個部分組成:
  • 排程引擎Cron的描述
  • 處理對象的檢索樣板(Query Template)
  • 動作的樣板(Action Template)
以上三個部分都定義在Alfresco延伸路徑內的scheduled-action-services-context.xml檔案內。初次使用時,請將scheduled-action-services-context.xml.sample拷貝後更名為scheduled-action-services-context.xml,因scheduled-action-services-context.xml.sample含有許多Spring Bean的參考範例,為避免載入不必要的設定,建議建立一個全新的context檔案。請依以下步驟編輯:
  1. 在<beans>標籤內定義第一個Bean叫做templateActionModelFactory,是用來產出樣板引擎FreeMarker可以存取的資料模型,內文為:
    <bean id="templateActionModelFactory" class="org.alfresco.repo.action.scheduled.FreeMarkerWithLuceneExtensionsModelFactory">
            <property name="serviceRegistry">
                <ref bean="ServiceRegistry"/>
            </property>
    </bean>
  2. 定義動作(Action)的執行程式,本範例以Alfresco後端Script定義動作的內容。因Alfresco內嵌完整存取Repository資源的JavaScript API,以Script實作動作邏輯既彈性(不必重啟系統)又快速。請在<beans>標籤內繼續輸入以下字串:
    <bean id="expenseVoucherMoveScriptAction" class="org.alfresco.repo.action.scheduled.SimpleTemplateActionDefinition">
          <property name="actionName">
            <value>script</value>
          </property>
          <property name="parameterTemplates">
            <map>
              <entry>
                <key>
                  <value>script-ref</value>
                </key>
                <value>${selectSingleNode('workspace://SpacesStore', 'lucene', 'PATH:"/app:company_home/app:dictionary/app:scripts/cm:expenseVoucherMove.js"' )}</value>
              </entry>
            </map>
          </property>
          <property name="templateActionModelFactory">
            <ref bean="templateActionModelFactory"/>
          </property>
          <property name="dictionaryService">
            <ref bean="DictionaryService"/>
          </property>
          <property name="actionService">
            <ref bean="ActionService"/>
          </property>
          <property name="templateService">
            <ref bean="TemplateService"/>
          </property>
    </bean>
    以上是定義一個名叫expenseVoucherMoveScriptAction的執行物件,這個物件會透過Lucene搜尋位於Company Home/Data Dictionary/Scripts路徑下名叫expenseVoucherMove.js的檔案。這個後端JavaScript檔案是實際將費用憑證檔案由『費用申請』檔案夾移到『費用審核』檔案夾的執行者。
  3. 定義被動作的標的物件(檔案或檔案夾)以及Cron的執行排程。在<beans>標籤內繼續輸入以下字串:
    <bean id="expenseVoucherMoveScriptRun" class="org.alfresco.repo.action.scheduled.CronScheduledQueryBasedTemplateActionDefinition">
          <property name="transactionMode">
              <value>UNTIL_FIRST_FAILURE</value>
          </property>
          <property name="compensatingActionMode">
              <value>IGNORE</value>
          </property>
          <property name="searchService">
              <ref bean="SearchService"/>
          </property>
          <property name="templateService">
              <ref bean="TemplateService"/>
          </property>
          <property name="queryLanguage">
              <value>lucene</value>
          </property>
          <property name="stores">
              <list>
                <value>workspace://SpacesStore</value>
              </list>
          </property>
          <!-- Find nodes with ExpenseDetails aspect -->
          <property name="queryTemplate">
              <value>+PATH:"/app:company_home/cm:費用申報/*" +ASPECT:"custom:ExpenseDetails"</value>
          </property>
          <property name="cronExpression">
              <value>0 0/5 * * * ?</value>
          </property>
          <property name="jobName">
              <value>jobD</value>
          </property>
          <property name="jobGroup">
              <value>jobGroup</value>
          </property>
          <property name="triggerName">
              <value>triggerA</value>
          </property>
          <property name="triggerGroup">
              <value>triggerGroup</value>
          </property>
          <property name="scheduler">
              <ref bean="schedulerFactory"/>
          </property>
          <property name="actionService">
              <ref bean="ActionService"/>
          </property>
          <property name="templateActionModelFactory">
              <ref bean="templateActionModelFactory"/>
          </property>
          <property name="templateActionDefinition">
              <ref bean="expenseVoucherMoveScriptAction"/>
          </property>
         
    <property name="transactionService">
    <ref bean="TransactionService"/>
          </property>
          <property name="runAsUser">
              <value>System</value>
          </property>
    </bean>
    以上是定義一個名叫expenseVoucherMoveScriptRun的執行物件,這個物件會每隔五分鐘(Cron語法 0 0/5 * * * ?)搜尋Company Home底下的『費用申報』檔案夾內(PATH前面的加號表示只搜尋這個目錄)是否存有貼有ExpenseDetails屬性集的檔案,如果存在的話,則執行expenseVoucherMoveScriptAction執行物件。
  4. 撰寫自動搬檔Script: expenseVoucherMove.js。請在Company Home/Data Dictionary/Scripts目錄下建立expenseVoucherMove.js檔案,搬移邏輯可以自由發揮。以下是參考範例:
    var verifyFolder = companyhome.childByNamePath("費用審核");
    if(verifyFolder != null && verifyFolder.hasPermission("CreateChildren")){
        //change the name with time stamp     
        var dt = new Date();
        var y = dt.getFullYear();  
        var m = dt.getMonth() + 1;
        if(m < 10){
           m = "0" + m;
        }else{
           m = "" + m;
        }
        var d = dt.getDate();
        if(d < 10){
           d = "0" + d;
        }else{
           d = "" + d;
        }
        var h = dt.getHours();
        if(h < 10){
           h = "0" + h;
        }else{
           h = "" + h;
        }
        var mm = dt.getMinutes();
        if(mm < 10){
           mm = "0" + mm;
        }else{
           mm = "" + mm;
        }
        var s = dt.getSeconds();
        if(s < 10){
           s = "0" + s;
        }else{
           s = "" + s;
        }
        var stamp = "T" + y + m + d + h + mm + s;
        //
        document.name = stamp + "_" + document.name;
        document.save();
        // 
        document.move(verifyFolder);
    }
    以上程式碼的意思是:找到費用審核的檔案夾,接著在檔名前冠上時間戳記,為避免相容性問題,建議檔名不要以數字開頭,再來就是將檔案搬移到『費用審核』檔案夾。

2011年3月7日 星期一

自訂Alfresco屬性值限制

Alfresco本身提供四種基本屬性值限制(Constraint),分別是:
  1. REGEX: 字串樣式規則
  2. LIST:列表式值
  3. MINMAX:區間值
  4. LENGTH:字串長度
為便於重用Constraint,我們利用以上四種基本型別製作一個比較大顆(Coarse Grain)的Constraint。例如:上篇文章提到的費用請款自訂屬性集(Custom Aspect)裡的『歸屬部門』與『費用分類』可以LIST方式呈現,『總金額』可以MINMAX方式限制,以避免使用者的錯誤輸入。

請開啟自訂資料模型檔customModel.xml(路徑請參考here),在</namespaces>結束標籤下方加入以下文字:
<constraints>
   <constraint name="custom:DepartmentList" type="LIST">
     <parameter name="allowedValues">
        <list>
            <value>研發部</value>
            <value>業務部</value>
            <value>管理部</value>
       </list>
     </parameter>
   </constraint>
   <constraint name="custom:ExpTypeList" type="LIST">
     <parameter name="allowedValues">
        <list>
            <value>交通費</value>
            <value>誤餐費</value>
            <value>住宿費</value>
            <value>油電費</value>
            <value>影印費</value>
            <value>文具用品</value>
            <value>書報雜誌</value>
            <value>設備維修</value>
       </list>
     </parameter>
   </constraint>
   <constraint name="custom:ExpAmtMax" type="MINMAX">
     <parameter name="minValue">
        <value>10</value>
     </parameter>
     <parameter name="maxValue">
        <value>10000</value>
     </parameter>
   </constraint>
</constraints>
再將以上三個Constraint加入自訂屬性的定義內,請在同一個檔案(customModel.xml)內將游標移到aspects >> aspect >> properties 內的 custom:Department 屬性標籤,在</property>結束標籤前加上:
<constraints>
   <constraint ref="custom:DepartmentList"/>
</constraints>
在custom:ExpenseType屬性標籤的</property>結束標籤前加上:
<constraints>
   <constraint ref="custom:ExpTypeList"/>
</constraints>
在custom:TotAmount屬性標籤的</property>結束標籤前加上:
<constraints>
   <constraint ref="custom:ExpAmtMax"/>
</constraints>
以上設定就完成了。因為Cutom Model只有在Alfresco啟動時讀入,修改後需重新啟動Server才可生效。
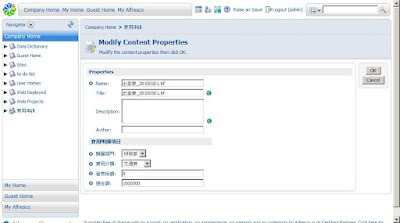
嘗試修改已存入的費用檔案看看,總金額故意填入100000
按OK確定後,螢幕出現的輸入限制對話框

以Aspect自訂Alfresco資料屬性

通常檔案的描述資料(Meta Data)有Name、Title、Description、Author、Created Date與Last Modified Date等,Alfresco除了上述Meta Data外,可以自訂各式的資料模型(Content Model)。缺少了自訂的資料模型,Alfresco只不過是一套檔案管理系統。要滿足各類應用程式的儲存需求,甚至成為應用系統的發展平台,自訂資料屬性是必備的基礎功能。Alfresco提供兩種自訂屬性的方法,一是創建一個新的內容種類(Content Type),於檔案存入時直接指定;另一種是新增Aspect(就是屬性集合的意思),再透過規則引擎將Aspect根據條件貼在檔案上。以下是新增Aspect的步驟:
  1. 將自訂資料模型設定檔掛入Alfresco的載入清單中
    Alfresco啟動時除內定的系統路徑外,還會搜尋延伸路徑內是否含有以-context.xml結尾的檔案。這個模式讓客製化時無需修改原廠預設值,只需將新增或修改的參數寫在延伸檔案內即可覆蓋。以包覆Tomcat6的Alfresco34d為例,其延伸路徑位於$TOMCAT_HOME/shared/classes/alfresco/extension目錄內。初次使用時,請將custom-model-context.xml.sample更名為custom-model-context.xml,以及將customModel.xml.sample更名為customModel.xml。之後以文字編輯器開啟custom-model-context.xml,確定alfresco/extension/customModel.xml是否在extension.dictionaryBootstrap載入的範圍內。(當然,自訂模型檔名不一定要叫customModel.xml)
  2. 編輯customModel.xml
    在內文最底下</model>標籤之上加入自訂屬性集標籤代碼<aspects></aspects>。Aspect加S表示可以加入多個屬性集。假設我們要收集的資料為費用請款憑證,需要輸入費用的發生部門、分類、營業稅額與請款總金額;在<aspects>與</aspects>標籤內輸入以下字串:
    <aspect name="custom:ExpenseDetails">
        <title>費用明細</title>
        <properties>
           <property name="custom:Department">
              <title>歸屬部門</title>
              <type>d:text</type>
              <protected>false</protected>
              <mandatory>true</mandatory>
              <multiple>false</multiple>
           </property>    
           <property name="custom:ExpenseType">
              <title>費用分類</title>
              <type>d:text</type>
              <protected>false</protected>
              <mandatory>true</mandatory>
              <multiple>false</multiple>
           </property>    
           <property name="custom:TaxAmount">
              <title>營業稅額</title>
              <type>d:int</type>
              <protected>false</protected>
              <mandatory>true</mandatory>
              <multiple>false</multiple>
          </property>    
          <property name="custom:TotAmount">
              <title>總金額</title>
              <type>d:int</type>
              <protected>false</protected>
              <mandatory>true</mandatory>
              <multiple>false</multiple>
          </property>    
       </properties>
    </aspect>
  3. 編輯web-client-config-custom.xml
    為避免修改出廠的使用者操作介面設定值,Alfresco的延伸路徑$TOMCAT_HOME/shared/classes/alfresco/extension內同樣存在一個供開發者客製畫面的檔案web-client-config-custom.xml。如果找不到的話,請將web-client-config-custom.xml.sample更名為web-client-config-custom.xml。以文字編輯器開啟該檔案,在最後一列</alfresco-config>標籤上面將新建的Aspect告知Alfresco,鍵入的文字如下:
    <config evaluator="string-compare" condition="Action Wizards">
         <aspects>
             <aspect name="custom:ExpenseDetails"/>
         </aspects>
    </config>
    <config evaluator="aspect-name" condition="custom:ExpenseDetails">
         <property-sheet>
             <separator name="SepExpense" display-label="費用明細項目" component-generator="HeaderSeparatorGenerator"/>
             <show-property name="custom:Department"/>
             <show-property name="custom:ExpenseType"/>
             <show-property name="custom:TaxAmount"/>
             <show-property name="custom:TotAmount"/>
         </property-sheet>
    </config>
    上述第一個config標籤是將Aspect加入Alfresco規則引擎的動作(Action)選項中,第二個config標籤是帶出該Aspect畫面時,哪些屬性要顯示出來(屬性不一定要全部顯示)。
  4. 建立檔案夾規則
    Aspect可透過規則引擎貼上內容檔案;當我們將費用憑證掃描成電子檔案(PDF或TIFF),存入Alfresco某一個檔案夾(在 Alfresco通稱為Space)時,可以有條件或無條件地建立一個規則(Rule),而規則的動作(Action)可以是將ExpenseDetails這個 Aspect指定給剛存入檔案。這個效果就是擴充了這個檔案的描述資料(Meta Data),這些Meta Data也可以併入Alfresco搜尋引擎(Lucene)的檢索範圍。
  5. 驗證效果
    1.進入費用憑證存放空間
    2.指定費用憑證圖檔
    3.指定檔案類型
    4.指定自訂的屬性資料

2011年3月5日 星期六

什麼是企業內容管理系統(ECM)

根據維基百科(Wikipedia)對ECM的定義;

ECM是一個通稱名詞,意義涵蓋文件管理(Document Management)、網站內容管理(Web Content Management)、搜尋(Search)、協同作業(Collaboration)、記錄管理(Records Management)、數位資產管理(Digital Asset Management)、工作流程管理(Workflow Management)以及文件掃描與擷取(Capture and Scanning)等領域。

ECM系統主要是設計來管理所有資訊由生成、處理、歸檔到銷毀等生命週期。

ECM系統可以三種方式呈現:安裝於企業內部網路、安裝於軟體服務商(SaaS)提供網路服務、或以上兩者聯合運作的混合模式。

ECM目的是讓企業資訊在儲存(Storage)、安控(Security)、版本(Version Control)、處理流程(Process Routing)、 以及保存(Retention)等方面都得以簡化。企業導入ECM系統的效益包括工作效率的提升、更好的資訊管空以及降低營運成本。例如,許多銀行已經採用ECM系統儲存支票影像以取代原本的檔案室保存方法。過去,客戶要調閱一張支票可能要耗上幾週的時間,因為銀行行員需要透過檔案室管理人員找出原始支票,影印後寄到分行,分行行員再寄給客戶。有了ECM系統後,銀行行員只要以戶頭帳號與支票號碼就可以調出支票影像,可以立即就印出郵寄或e-mail給客戶,客戶往往還沒掛上電話,工作就已經完成了。

Alfresco ECM 使用案例

儘管非結構化文件佔了企業內容的八成,但要像ERP系統一樣的廣為採用,企業內容管理系統可能需要更多的使用案例與觀念傳播 。 以下是Alfresco(Open Source Enterprise Content Management)在無紙化辦公室的應用案例;(原本取自Techworld Australia Allianz removes walls of paper with open source ECM)

雖然無紙化辦公室仍舊是遙遠的夢想,但保險巨人Allianz利用Alfresco ECM取代原有的紙本作業,成功挪出佔據辦公區大部分區域的檔案室。據Allianz(安聯集團)澳洲公司的辦公室自動化經理Tim Rynne指出,這個無紙化計畫早在18個月前已經定案,但一直苦於缺乏適當的解決方案。他說:"我們是帶了一堆文件進駐到無紙化的新辦公室,每個人的桌面仍舊充滿文件,尤其是便利貼"

Allianz 澳洲公司擁有超過兩百萬份保單以及三百多個員工,其資訊部門享有高度的自主決策權。

Rynne指出“我們有許多關於文件管理的系統,但都是各司其職,我們有Lotus Notes的內容 、紙本檔案、傳統檔案夾以及連結這些資源的儲存伺服器。”

因為許多專案都跟流程自動化(BPM)有關,都需要一套通用的 ECM (Enterprise Content Management)來填補除了儲存之外的功能,同時也要降低文件散佈與傳閱的其他問題。

另外,由紙本轉為電子化的流程處理,也將讓Allianz省去了文件的存放空間,確實地提高ECM專案的投資報酬率。

歷經三個月的評估後, Allianz選擇Open Source Alfresco ECM,並委由澳洲當地的顧問公司 Lateral Minds執行導入工作。

“我們最重要的評估標準是成本、彈性、功能、技術與整合等項指標,Alfresco除了擁有曾經待過Documentum 的熟練技術人員,廣大的社群用戶、企業與社群公用兩類版本以及方便的在地支援廠商都是勝出的因素”,Rynne指出。身為保險公司,組織本身就比較保守,開放原始程式碼並不是一項有力的誘因,但近年來Open Source專案的高人氣與企圖,讓我們決定一試。

“因為諸多的結構性問題,我們重新檢視過去已測試過的Open Source各項風險,加上最近的入口網站建置也採用Open Source專案系統,讓我們資訊部門決定 “打鐵趁熱”。

自成功上線後的12個月內,Allianz已存入將近一百萬份的文件進Alfresco ECM,總容量達500G。

“現在,文件不必再到處拷貝了,我們將文件掃描進Alfresco系統後再放入檔案室或銷毀” Rynne說,“文件對某些單位來說必須完整保存 – 例如:為符合法規,原始理賠文件在結案後需保留七年的時間,但這些文件已不必存放在主要的辦公區了。”

導入Alfresco後,Allianz正在研究如何擴展Alfresoc在BPM與作業效率方面的提升。

“我們剛導入一套用大型主機系統來列印保單與文件,再以PDF型式存入Alfresco以防止重複列印。現在,每天早上六點鐘前我們就可以取得保單以及歷史統計資料。”

整個BPM專案包括文件遞送方式,如電子郵件、傳真或掃描,以及Lotus Domino的整合。

“我們也嘗試以Alfresco改善保單簽署與處理程序的控管,以及讓分散在各地的業務人員可以隨時取得最新的保單文件”。

12個月後的效益:

電子化的效益,最簡單明顯的改變,原本文件佔據的空間還給了辦公室。

“我們擷取資料的速度提升許多,這點要感謝Alfresco的貢獻” Rynne說。

至於導入費用上, Rynne 表示 “恕難奉告”, 但他透露 “Alfresco比起其他方案省很多很多”。

Rynne對導入速度也讚賞有佳,Alfresco的部分只用了幾個星期,同時包括了壓力測試。

“導入的效益從第一天起就看得到,”他說, “使用者可以清楚看到文件處理程序,完全不用再依賴存放在檔案室的紙本文件”

Allianz 也打算將人工處理密集的理賠作業轉為自動流程處理。

文字自動辨識OCR對眾多文件是一大焦點,許多文件儘管數位化了,但並沒有建立有效的索引資料。

“我們擁有許多影像資料,並想辦法如何用以對付理賠的詐欺案件,例如,快速調出與比對照片影像,” Rynne說。

"我們還有大約百萬份的文件要處理,但這已不是什麼挑戰了,因為處理的程序方法已經在那裡了"

Allianz只有兩名開發人員負責Alfresco,不算多的資源投入, 但他們對Alfresco感到非常滿意,因為他們實際的工作是 "提升"而不是"維護" Alfrescos。

“我們看待Open Source時會覺得,它的投資不會很大,” Rynne說,“真正的投資都是在上線使用後發生的”。

“我們第一天就倒入25萬份文件,Alfresco就像網站宣稱的一樣穩定。我們很快地就建置一套ECM系統,花費不高但未來的成長潛力無限”。

Lateral Minds主管指出,採用像Alfresco這樣的Open source ECM,Allianz可以集中心力在保險事業上, 而不是內容管理上。

2008年6月8日 星期日

Adempiere 351a 以 Silent setup 方式安裝於 Debian 的問題

不知道哪一個版本開始, Adempiere 提供了 Linux 環境無需 X-window 程式庫的 Silent 安裝模式, 看起來是可以簡化一點遠端安裝 Adempiere 的麻煩(Client 端需安裝 X Server). 今日姑且一試, 發現還有幾個問題需手動解決:

  1. 修改 $ADEMPIERE_HOME/AdempiereEnvTemplate.properties 內容後, 將其更名為 AdempiereEnv.properties, 再執行 RUN_silentsetup.sh 時系統會出現找不到 myKeystore (存於目錄 $ADEMPIERE_HOME/keystore 下). 解決方法為以 $JAVA_HOME/bin/keytool 自行產生一個密鑰, 指令為 $JAVA_HOME/bin/keytool -genkey -keystore myKeystore (意思是產生一個新的密鑰存於檔名為 myKeystore 之檔案), 將 myKeystore 複製到 $ADEMPIERE_HOME/keystore 目錄內再重新執行 RUN_silentsetup.sh 應該就順利完成第一步的程式安裝工作.

  2. 程式安裝完成後, 接著是建立資料庫綱要(Database Schema). Adempiere 大部分功能都建構於 Application Dictionary 之上, 即功能本身就是一種資料. 建立新安裝系統之 Database Schema 最簡單的方式莫過於直接回復(Restore)開發環境的資料庫匯出檔(Dump file). 當執行 $ADEMPIERE_HOME/utils/RUN_ImportAdempiere.sh 時, 有兩個地方是前一步驟 RUN_silentsetup.sh 沒有在 myEnvironment.sh 內指定好的, 需要手動修正:
    • ADEMPIERE_DB_URL 未指定. 以資料庫為 Oracle XE 為例, ADEMPIERE_DB_URL 的值可能為 jdbc:oracle:thin:@//localhost:1521/xe
    • ADEMPIERE_DB_PATH 未指定. 以資料庫系統為 Oracle XE 為例, ADEMPIERE_DB_PATH 之值為 oracleXE

  3. 啟動 Adempiere 應用程式伺服器 JBoss (即執行 RUN_Server2.sh) 時內定只監聽本機之請求, 如需解除此一限制, 需手動修改 $JBOSS _HOME/bin/run.sh -c adempiere -b $ADEMPIERE_APPS_SERVER 此行之 -b 屬性, 由 $ADEMPIERE_APPS_SERVER 改成 0.0.0.0, 代表接受任何網路位址之呼叫請求.

  4. RUN_Server2Stop.sh (用於卸載 Adempiere Application Server) 於 $JBOSS_HOME/bin/shutdown.sh 此一行內未加入 -S 屬性, Adempiere Application Server 無法卸載.

2008年5月25日 星期日

Debian 上安裝 Oracle 10g XE

Oracle 為方便廣大 Debian 用戶快速安裝 Oracle 資料庫管理系統, 特別提供了 Debian 系統專區, 使用者只要以 aptitude 或 apt-get 指令即可網路安裝 Oracle RDBMS, 免除了惱人的程式庫相依與系統下載問題. 以下是在 Debian 上安裝 Oracle 10g Express Edition 之步驟:

  1. 以 root 身分開啟命令模式的 Terminal

  2. 修改 etc/apt/sources.list 檔案, 指令為:
    nano /etc/apt/sources.list

  3. 於最後一行加入以下文字:
    deb http://oss.oracle.com/debian unstable main non-free

  4. 按 Ctrl + O 存檔並退回 Terminal 命令列

  5. 下載該網站之公鑰, 於命令列下輸入:
    wget http://oss.oracle.com/el4/RPM-GPG-KEY-oracle

  6. 將下載之公鑰加入公鑰儲存庫, 於命令列下輸入:
    apt-key add RPM-GPG-KEY-oracle

  7. 更新 Debian 安裝儲存區資訊, 於命令列下輸入:
    apt-get update

    如果沒有錯誤訊息, 便可以安裝 libaio, Oracle Client, Oracle XE, 與 Oracle XE Universal 等模組了.

  8. 正式安裝 Oracle XE Universal, 於命令列下輸入:
    apt-get install oracle-xe-universal

  9. 接著設定 Oracle XE 之啟動參數, 於命令列下輸入:
    /etc/init.d/oracle-xe configure

    • 系統內定的網頁管理介面的通訊阜為 8080, 資料庫通訊阜為 1521
    • 指定 SYS 與 SYSTEM 之密碼
    • 讓 Oracle 10g XE 於開機時一併啟動

  10. Oracle XE 安裝到此完成, 請啟動瀏覽器於網址列輸入 http://127.0.0.1:8080/apex, 並以使用帳號 system 與剛剛指定的密碼登入管理介面. 請留意 Oracle XE 的管理程式只接受本機(127.0.0.1) 8080阜號的請求.

  11. 如要方便執行 Oracle XE 的 sqlplus, tnsping 等工具程式, 需先設定 Oracle XE 的環境變數, 請於命令列下執行:
    source /usr/lib/oracle/xe/app/oracle/product/10.2.0/server/bin/oracle_env.sh

  12. 讓任何電腦皆可以登入 Oracle XE 管理程式的方法如下:
    • 以 system 身分透過 sqlplus 登入 Oracle, 命令為 sqlplus system@xe , 輸入密碼後應該就進入 SQL 命令模式.
    • 在 SQL> 下輸入 EXEC DBMS_XDB.SETLISTENERLOCALACCESS(FALSE); 按 Enter 鍵執行.
    • exit 退出 sqlplus
    • 回到終端機命令列後以 netstat -na 查看 8080 監聽的Local Address 是否為 0.0.0.0

2007年12月1日 星期六

Import language transalation into Compiere how-to

For Compiere evaluation users, it's nice to have their locale interface to operate with. Please follow the steps to complete the language translation importation:
  1. Login Compiere with user 'System', there is only one Role 'System Administrator' and one Client 'System' to choose, press OK to continue.
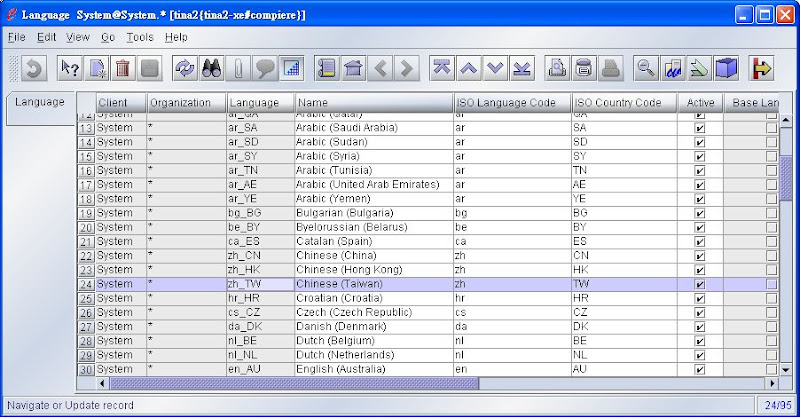
  2. From top up menu tree, go to System Admin/General Rules/System Rules/Language


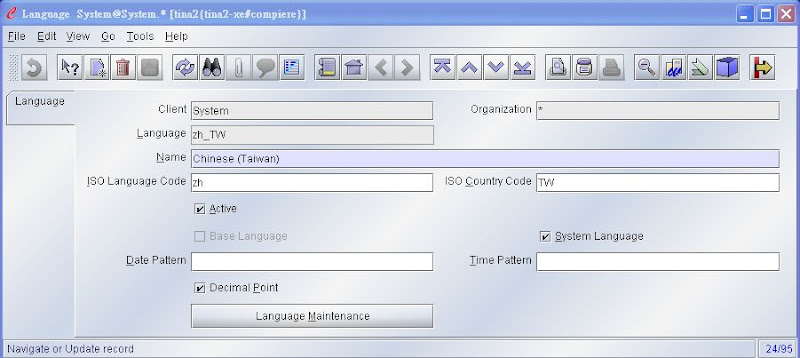
  3. Change view from 'List View' to 'Form View' by button Grid Toggle from menubar.
  4. Click button 'Language Maintenance' to populate those translatable tags into database. And press 'OK' to start process from current message dialog.
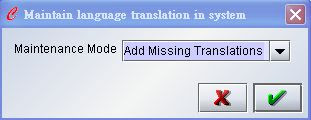
  5. On the maintain language translation in system dialog windows, please select 'Add missing translation' item and press 'OK' to continue.
  6. After a while, when Compiere comes back to Language form again, the missing translation tags were arranged ok await for translation. Close current windows and choose 'Translation import/export' under /Menu/System Admin/General Rules/System Rules.
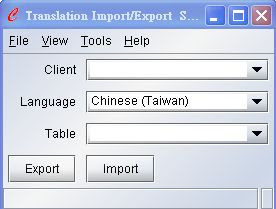
  7. Please select 'System' item from Client combobox and the language translations you are going to import. Left the Table combobox blank, since you can import more than one table in the same time. Press button Import to continue.
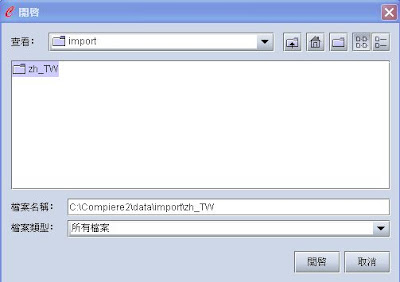
  8. The last step is to indicate which folder contains the translation files. Only folder name is neccessary, since Compiere would detect hoe many files in this folder and import whole of them into database automitically. The screen below is just for example.
  9. Press button Open to start import job. This process would take minutes to complete. There is no progress bar this time, just waiting for screen to come back to what you have looked at step 6. Close the window and logout Compiere.
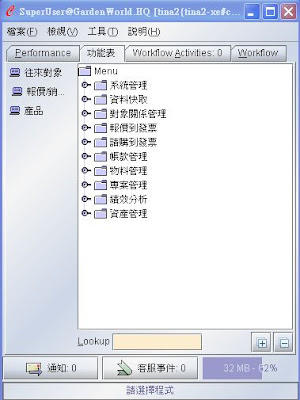
  10. Please login again with user 'SuperUser', don't forget to select the language you just added in, then select the role other than System Administrator(such as GardenWorld Admin, or gardenWorld User,,), you would see the big changes.

How does sqlplus know which SID to connect for Oracle 10g Express ?

After Oralce 10g express was installed and web console (http://oracle-xe-host-name:8080/apex) worked fine, how about now you apply sqlplus to connect the absolutely only one instance 'XE' in the same machine ? Since there is no Oracle 10g express client installed, sqlplus has no idea where TNS administration is located, it's therefore no way to connect instance 'XE'. Please try the followings to solve:
  • For Windows: Set system variable TNS_ADMIN equal to %ORACLE_XE_SERVER_HOME%\NETWORK\ADMIN
  • For Linux: Copy tnsnames.ora from $ORACLE_XE_SERVER_HOME/networ/admin to /etc

2007年11月20日 星期二

Install TinyERP 4.2 Client on Windows

Install TinyERP Client on Windows is nothing but downloading client execution file from url http://tinyerp.com/download/stable/win32/tinyerp-client-setup-4.2.0.exe and invoke it.

But there is still a tiny problem after the installation, you have to modify the program location from properties of menu item "Start/Program Files/TinyERP Client/TinyERP Client", it was wrong typed as "C:\Program Files\TinyERP Client\\doc", please correct it to "C:\Program Files\TinyERP Client", otherwise this program cannot startup from Windows menu if your operation system happened to be Windows XP Profeesional or Windows XP Home.

10 First steps with Intalio|BPMS

The following content comes from http://bpms.intalio.com, the open source BPM tool contributed from Intalio

This page is the first page you should read to learn how to start with IntalioBPMS. It aims at pointing you to the 10 first actions you should take in order to get started with IntalioBPMS.

  1. Download the product from the download section. Make sure to download both IntalioBPMS Designer and IntalioBPMS runtime components.
  2. Install Designer by following the instructions of Getting Started: IntalioBPMS Designer
  3. Install the runtime components (Geronimo, IntalioBPMS Server, IntalioBPMS Workflow, IntalioBPMS Console) by following the instructions of Getting Started: IntalioBPMS Server
  4. Run the Absence Request scenario by following the instructions. It will give you an idea of what a complete end-to-end process may look like for an end-user.
  5. You are now ready to design your first process. Please follow the 'Getting Started: Implementing your first process.'
  6. Test your first process by following the 'Getting Started: Deploying and testing your first process'
  7. Learn advanced concepts with our tutorials.
  8. Get help from our users in the forums. Do not hesitate to share your experience with them and with us!
  9. Sign up for a training if you want to learn more and meet us
  10. Finally if you have followed all those steps, you can contribute back by using the library.

Documentation for ERP

The following writing comes from HCi Professional Services, ERP consultant should get inspired from. The article titled "Does your ERP documentation look like this?"

"There are two ways to document a computer system:
  • system-based: from the inside out (“here’s what the system does”)
  • task-based: from the outside in (“here’s how to do your job using the system”)

ERP system documentation is almost all system-based, and it doesn’t work."

Download the full white paper as a PDF file.

Dump PostgreSQL database from Windows and restore to Linux

It's often the case that you develop lots of stuffs on Windows, and some are database record dependency, such as language translation stored in database, that make porting data from two servers much more difficult. There is a quick and dirty way to solve it by dumping database from each other. Next is the sample to dump PostgreSQL database from Windows and restore into Linux's.

  1. Dump from PostgreSQL on Windows
    • cd %POSTGRESQL_SERVER_HOME%/bin
    • pg_dump -U <db_user> -W <db_passwd> <db_name> > outfile
      • for example: pg_dump -U postgres -W terp > terp.dump
  2. Restore into PostgreSQL on Linux
    • su - postgres
      • Assume the database owner is postgres
    • /usr/local/pgsql/bin/createdb --encoding=UNICODE terp
      • Assume PostfreSQL homed at /usr/local/pgsql and database name is terp
    • /usr/local/pgsql/bin/psql terp <>
      • Assume the restored database is terp and dump file named terp.dump

2007年11月19日 星期一

Install TinyERP 4.2 Server on Debian 4.0

Business model on open source is often trading-off between two things, source code and knowledge. You can get any source code but detail stories for it, if you don't like their way, share your knowledge to leverage them.

I have recently a chance to get around with TinyERP that is growing very fast on functionality, if you have no idea about Python language, to get Tiny running on Linux server is kind of tough work. Followings are my steps to complete the installation.

  1. Pre-dependencies
    • PostgreSQL server
  2. Install TinyERP server dependencies
    • Python 2.4
      • Incleded in standard base Debian 4.0 R1
    • PostgeSQL client
      • apt-get install postgresql-client
        • Default version is postgresql-7.4
    • Python and PostgreSQL adaptor
      • apt-get install python-psycopg
    • Python time zone
      • apt-get install python-tz
    • libxml2 and python binding
      • apt-get install python-xml python-libxml2
    • libxslt and python binding
      • apt-get install python-libxslt1
    • Reportlab pdf generator for Python
      • apt-get install python-reportlab
    • Python imaging library
      • apt-get install python-imaging
    • Graph visualization software
      • apt-get install graphviz
    • Pyparsing library
      • apt-get install python-pyparsing
  3. Get TinyERP server source file and install
    • wget http://tinyerp.com/download/stable/source/tinyerp-server-4.2.0.tar.gz
    • tar vxf tinyerp-server-4.2.0.tar.gz
    • cd tinyerp-server-4.2.0
    • sudo python setup.py install
      • Installation folder is /usr/lib/python2.4/site-packages/tinyerp-server
  4. Create TinyERP database
    • su - postgres
    • /usr/local/pgsql/bin/createdb --encoding=UNICODE terp
      • Assume PostgreSQL homed at /usr/local/pgsql and creating database named terp
  5. Startup TinyERP Server
    • cd /usr/lib/python2.4/site-packages/tinyerp-server
    • sudo python tinyerp-server.py -d terp -r postgres -w --db_host=localhost --db_port=5432 --logfile="tinyerp-server.log"
      • Assume the database name is terp, database owner is postgres, database server located at the same machine, database listening port is 5432, and logfile is tinyerp-server.log right in the current directory.
      • You can make a batch script (ex. run.sh) to shorten the long command typing.

Install PostgreSQL 8.2.5 Server on Debian 4.0

Instead of applying command apt-get, the PostgreSQL database server will be installed from source on the standard base only debian to get the update to date PostgreSQL working,
  1. Install C compiler and dependencies
    • apt-get install gcc libc6-dev libreadline5-dev zlib1g-dev
      • gcc library could be got from installation cd
      • gcc-4.1 and libssp0 (4.1.1-21) were installed
      • linux-kernel-headers was setting up
      • libc6-dev (2.3.6.ds1-13etch2) was setting up
      • .....
  2. Download PostgreSQL source
    • wget ftp://ftp4.tw.postgresql.org/pub/postgresql/source/v8.2.5/postgresql-8.2.5.tar.gz
    • tar vxf postgresql-test-8.2.5.tar.gz
  3. Make and install
    • change directory to postgresql-8.2.5
    • ./configure
    • make
    • su
    • make install
      • installed at /usr/local/pgsql
    • adduser postgres
      • Change password by : passwd postgres
    • mkdir /usr/local/pgsql/data
    • chown postgres /usr/local/pgsql/data
    • su - postgres
    • /usr/local/pgsql/bin/initdb -D /usr/local/pgsql/data
      • This is to create initial management databases.
  4. Startup PostgreSQL Server
    • su - postgres
    • /usr/local/pgsql/bin/postgres -D /usr/local/pgsql/data >logfile 2>&1 &
    • Or /usr/local/pgsql/bin/pg_ctl start -D /usr/local/pgsql/data -l logfile
      • logfile would be output at the place that user 'postgres' has write priviledge
  5. Create new database (named test)
    • su - postgres
    • /usr/local/pgsql/bin/createdb test
  6. Test connection
    • su - postgres
    • /usr/local/pgsql/bin/psql test