- Login Compiere with user 'System', there is only one Role 'System Administrator' and one Client 'System' to choose, press OK to continue.
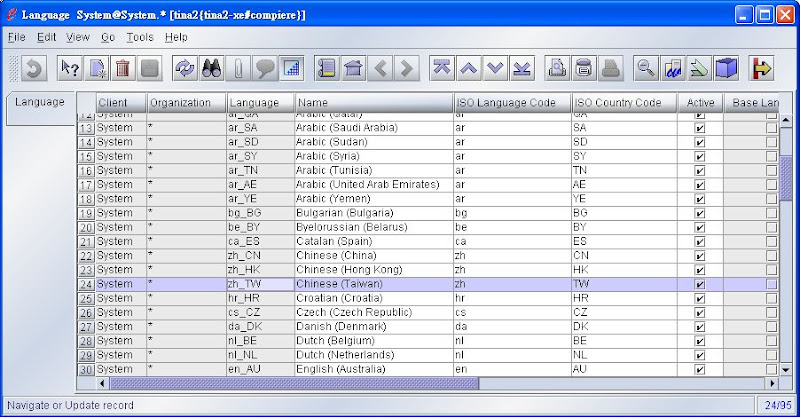
- From top up menu tree, go to System Admin/General Rules/System Rules/Language
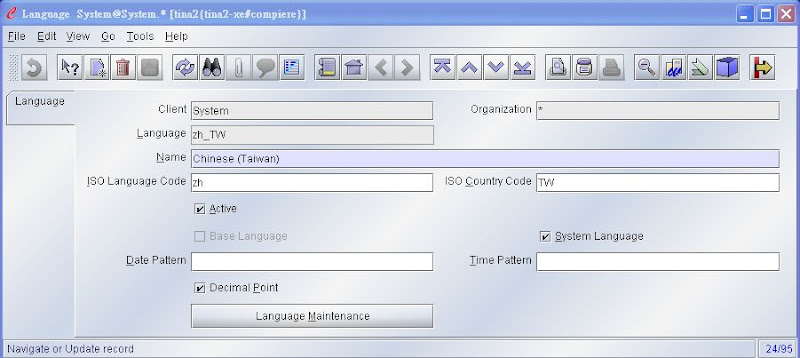
- Change view from 'List View' to 'Form View' by button Grid Toggle from menubar.
- Click button 'Language Maintenance' to populate those translatable tags into database. And press 'OK' to start process from current message dialog.
- On the maintain language translation in system dialog windows, please select 'Add missing translation' item and press 'OK' to continue.
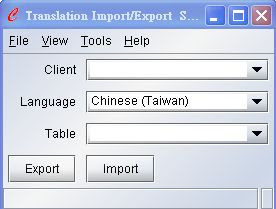
- After a while, when Compiere comes back to Language form again, the missing translation tags were arranged ok await for translation. Close current windows and choose 'Translation import/export' under /Menu/System Admin/General Rules/System Rules.
- Please select 'System' item from Client combobox and the language translations you are going to import. Left the Table combobox blank, since you can import more than one table in the same time. Press button Import to continue.
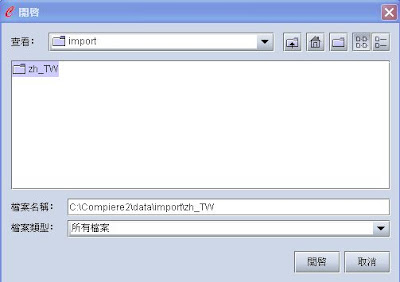
- The last step is to indicate which folder contains the translation files. Only folder name is neccessary, since Compiere would detect hoe many files in this folder and import whole of them into database automitically. The screen below is just for example.
- Press button Open to start import job. This process would take minutes to complete. There is no progress bar this time, just waiting for screen to come back to what you have looked at step 6. Close the window and logout Compiere.
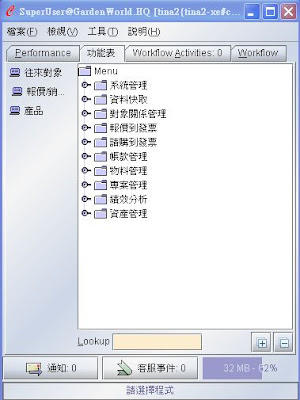
- Please login again with user 'SuperUser', don't forget to select the language you just added in, then select the role other than System Administrator(such as GardenWorld Admin, or gardenWorld User,,), you would see the big changes.
2007年12月1日 星期六
Import language transalation into Compiere how-to
For Compiere evaluation users, it's nice to have their locale interface to operate with. Please follow the steps to complete the language translation importation:
How does sqlplus know which SID to connect for Oracle 10g Express ?
After Oralce 10g express was installed and web console (http://oracle-xe-host-name:8080/apex) worked fine, how about now you apply sqlplus to connect the absolutely only one instance 'XE' in the same machine ? Since there is no Oracle 10g express client installed, sqlplus has no idea where TNS administration is located, it's therefore no way to connect instance 'XE'. Please try the followings to solve:
- For Windows: Set system variable TNS_ADMIN equal to %ORACLE_XE_SERVER_HOME%\NETWORK\ADMIN
- For Linux: Copy tnsnames.ora from $ORACLE_XE_SERVER_HOME/networ/admin to /etc
2007年11月20日 星期二
Install TinyERP 4.2 Client on Windows
Install TinyERP Client on Windows is nothing but downloading client execution file from url http://tinyerp.com/download/stable/win32/tinyerp-client-setup-4.2.0.exe and invoke it.
But there is still a tiny problem after the installation, you have to modify the program location from properties of menu item "Start/Program Files/TinyERP Client/TinyERP Client", it was wrong typed as "C:\Program Files\TinyERP Client\\doc", please correct it to "C:\Program Files\TinyERP Client", otherwise this program cannot startup from Windows menu if your operation system happened to be Windows XP Profeesional or Windows XP Home.
But there is still a tiny problem after the installation, you have to modify the program location from properties of menu item "Start/Program Files/TinyERP Client/TinyERP Client", it was wrong typed as "C:\Program Files\TinyERP Client\\doc", please correct it to "C:\Program Files\TinyERP Client", otherwise this program cannot startup from Windows menu if your operation system happened to be Windows XP Profeesional or Windows XP Home.
10 First steps with Intalio|BPMS
The following content comes from http://bpms.intalio.com, the open source BPM tool contributed from Intalio
This page is the first page you should read to learn how to start with IntalioBPMS. It aims at pointing you to the 10 first actions you should take in order to get started with IntalioBPMS.
- Download the product from the download section. Make sure to download both IntalioBPMS Designer and IntalioBPMS runtime components.
- Install Designer by following the instructions of Getting Started: IntalioBPMS Designer
- Install the runtime components (Geronimo, IntalioBPMS Server, IntalioBPMS Workflow, IntalioBPMS Console) by following the instructions of Getting Started: IntalioBPMS Server
- Run the Absence Request scenario by following the instructions. It will give you an idea of what a complete end-to-end process may look like for an end-user.
- You are now ready to design your first process. Please follow the 'Getting Started: Implementing your first process.'
- Test your first process by following the 'Getting Started: Deploying and testing your first process'
- Learn advanced concepts with our tutorials.
- Get help from our users in the forums. Do not hesitate to share your experience with them and with us!
- Sign up for a training if you want to learn more and meet us
- Finally if you have followed all those steps, you can contribute back by using the library.
Documentation for ERP
The following writing comes from HCi Professional Services, ERP consultant should get inspired from. The article titled "Does your ERP documentation look like this?"
"There are two ways to document a computer system:
"There are two ways to document a computer system:
- system-based: from the inside out (“here’s what the system does”)
- task-based: from the outside in (“here’s how to do your job using the system”)
ERP system documentation is almost all system-based, and it doesn’t work."
Download the full white paper as a PDF file.
Dump PostgreSQL database from Windows and restore to Linux
It's often the case that you develop lots of stuffs on Windows, and some are database record dependency, such as language translation stored in database, that make porting data from two servers much more difficult. There is a quick and dirty way to solve it by dumping database from each other. Next is the sample to dump PostgreSQL database from Windows and restore into Linux's.
- Dump from PostgreSQL on Windows
- cd %POSTGRESQL_SERVER_HOME%/bin
- pg_dump -U <db_user> -W <db_passwd> <db_name> > outfile
- for example: pg_dump -U postgres -W
terp > terp.dump - Restore into PostgreSQL on Linux
- su - postgres
- Assume the database owner is postgres
- /usr/local/pgsql/bin/createdb --encoding=UNICODE terp
- Assume PostfreSQL homed at /usr/local/pgsql and database name is terp
- /usr/local/pgsql/bin/psql terp <>
- Assume the restored database is terp and dump file named terp.dump
- Assume the restored database is terp and dump file named terp.dump
2007年11月19日 星期一
Install TinyERP 4.2 Server on Debian 4.0
Business model on open source is often trading-off between two things, source code and knowledge. You can get any source code but detail stories for it, if you don't like their way, share your knowledge to leverage them.
I have recently a chance to get around with TinyERP that is growing very fast on functionality, if you have no idea about Python language, to get Tiny running on Linux server is kind of tough work. Followings are my steps to complete the installation.
I have recently a chance to get around with TinyERP that is growing very fast on functionality, if you have no idea about Python language, to get Tiny running on Linux server is kind of tough work. Followings are my steps to complete the installation.
- Pre-dependencies
- PostgreSQL server
- Install TinyERP server dependencies
- Python 2.4
- Incleded in standard base Debian 4.0 R1
- PostgeSQL client
- apt-get install postgresql-client
- Default version is postgresql-7.4
- Python and PostgreSQL adaptor
- apt-get install python-psycopg
- Python time zone
- apt-get install python-tz
- libxml2 and python binding
- apt-get install python-xml python-libxml2
- libxslt and python binding
- apt-get install python-libxslt1
- Reportlab pdf generator for Python
- apt-get install python-reportlab
- Python imaging library
- apt-get install python-imaging
- Graph visualization software
- apt-get install graphviz
- Pyparsing library
- apt-get install python-pyparsing
- Get TinyERP server source file and install
- wget http://tinyerp.com/download/stable/source/tinyerp-server-4.2.0.tar.gz
- tar vxf tinyerp-server-4.2.0.tar.gz
- cd tinyerp-server-4.2.0
- sudo python setup.py install
- Installation folder is /usr/lib/python2.4/site-packages/tinyerp-server
- Create TinyERP database
- su - postgres
- /usr/local/pgsql/bin/createdb --encoding=UNICODE terp
- Assume PostgreSQL homed at /usr/local/pgsql and creating database named terp
- Startup TinyERP Server
- cd /usr/lib/python2.4/site-packages/tinyerp-server
- sudo python tinyerp-server.py -d terp -r postgres -w
- Assume the database name is terp, database owner is postgres, database server located at the same machine, database listening port is 5432, and logfile is tinyerp-server.log right in the current directory.
- You can make a batch script (ex. run.sh) to shorten the long command typing.
Install PostgreSQL 8.2.5 Server on Debian 4.0
Instead of applying command apt-get, the PostgreSQL database server will be installed from source on the standard base only debian to get the update to date PostgreSQL working,
- Install C compiler and dependencies
- apt-get install gcc libc6-dev libreadline5-dev zlib1g-dev
- gcc library could be got from installation cd
- gcc-4.1 and libssp0 (4.1.1-21) were installed
- linux-kernel-headers was setting up
- libc6-dev (2.3.6.ds1-13etch2) was setting up
- .....
- Download PostgreSQL source
- wget ftp://ftp4.tw.postgresql.org/pub/postgresql/source/v8.2.5/postgresql-8.2.5.tar.gz
- tar vxf postgresql-test-8.2.5.tar.gz
- Make and install
- change directory to postgresql-8.2.5
- ./configure
- make
- su
- make install
- installed at /usr/local/pgsql
- adduser postgres
- Change password by : passwd postgres
- mkdir /usr/local/pgsql/data
- chown postgres /usr/local/pgsql/data
- su - postgres
- /usr/local/pgsql/bin/initdb -D /usr/local/pgsql/data
- This is to create initial management databases.
- Startup PostgreSQL Server
- su - postgres
- /usr/local/pgsql/bin/postgres -D /usr/local/pgsql/data >logfile 2>&1 &
- Or /usr/local/pgsql/bin/pg_ctl start -D /usr/local/pgsql/data -l logfile
- logfile would be output at the place that user 'postgres' has write priviledge
- Create new database (named test)
- su - postgres
- /usr/local/pgsql/bin/createdb test
- Test connection
- su - postgres
- /usr/local/pgsql/bin/psql test
訂閱:
文章 (Atom)
